0%

Linux上的防火墙前端 - 简单配置 ufw 允许 KDE Connect

Allow KDE Connect through firewall

Firewalld

1
2
3
sudo firewall-cmd --zone=public --permanent --add-port=1714-1764/tcp
sudo firewall-cmd --zone=public --permanent --add-port=1714-1764/udp
sudo systemctl restart firewalld.service

UFW firewall

1
2
3
sudo ufw allow 1714:1764/udp
sudo ufw allow 1714:1764/tcp
sudo ufw reload

Refer:
https://www.incredigeek.com/home/allow-kde-connect-through-firewall/

配置 ufw 允许 hotspot

  1. 首先需要在ufw中开启数据包转发。
    需要调整两个配置文件,将 /etc/default/ufw 文件默认转发策略的值更改为“ACCEPT”:
1
2
3
4
5
sudo vim /etc/default/ufw

...
DEFAULT_FORWARD_POLICY="ACCEPT"
...

然后编辑/etc/ufw/sysctl.conf并取消注释:

1
2
3
4
5
6
sudo vim /etc/ufw/sysctl.conf

...
net/ipv4/ip_forward=1
net/ipv6/conf/default/forwarding=1
...
  1. 将规则添加到 /etc/ufw/before.rules 文件中。默认规则只配置过滤表,并且启用伪装nat表需要配置。将以下内容添加到文件顶部的标题注释之后:
1
2
3
4
5
6
7
8
9
10
11
12
13
sudo vim /etc/ufw/before.rules

...
# nat Table rules
*nat
:POSTROUTING ACCEPT [0:0]

# Forward traffic from wlp58s0 through enp0s20f0u2u1.
-A POSTROUTING -s 10.42.0.0/24 -o enp0s20f0u2u1 -j MASQUERADE

# don't delete the 'COMMIT' line or these nat table rules won't be processed
COMMIT
...
  1. 最后,禁用并重新启用 ufw 以应用更改:
    1
    sudo ufw disable && sudo ufw enable

Refer:
https://ubuntu.com/server/docs/security-firewall

onedrive_app_on_Linux

1
2
3
4
sudo pacman -S archlinuxcn/onedrive-abraunegg

yay -S aur/insync

ClamAV - Linux上的杀毒软件

安装

安装ClamAV软件包。

1
sudo pacman -S clamav clamtk

更新数据库

更新病毒定义库:

1
2
sudo freshclam

如果使用代理,请编辑/etc/clamav/freshclam.conf,更新 HTTPProxyServer、HTTPProxyPort、HTTPProxyUsername 和 HTTPProxyPassword。

数据库文件保存在:

1
2
3
/var/lib/clamav/daily.cvd
/var/lib/clamav/main.cvd
/var/lib/clamav/bytecode.cvd

启动/启用 clamav-freshclam.service以使病毒定义保持最新。

1
2
3
sudo systemctl start clamav-freshclam.service
sudo systemctl enable clamav-freshclam.service
systemctl status clamav-freshclam.service

启动守护进程

注释:

  • 需要freshclam在第一次启动服务之前运行,否则会遇到问题/错误,这将阻止 ClamAV 正确启动。
  • 如果只想执行独立扫描,则不需要守护程序。请参阅下面的扫描病毒

该服务叫做clamav-daemon.service启动它并使其在系统启动时自动启动。

1
2
3
sudo systemctl start clamav-daemon.service
sudo systemctl enable clamav-daemon.service
systemctl status clamav-daemon.service

测试软件

为了确保 ClamAV 和定义安装正确,请使用 clamscan扫描EICAR 测试文件(一个不含病毒代码的无害签名)。

1
curl https://secure.eicar.org/eicar.com.txt | clamscan -

输出 必须 包含:

1
stdin: Win.Test.EICAR_HDB-1 FOUND

Option #1: Set up Fangfrisch

1
yay -S aur/python-fangfrisch
1
2
3
4
5
sudo -u clamav /usr/bin/fangfrisch --conf /etc/fangfrisch/fangfrisch.conf initdb

sudo systemctl enable fangfrisch.timer
sudo systemctl start fangfrisch.timer
systemctl status fangfrisch.timer

Option #2: Set up clamav-unofficial-sigs

1
yay -S aur/clamav-unofficial-sigs
1
2
sudo clamav-unofficial-sigs.sh
sudo less /var/log/clamav-unofficial-sigs/clamav-unofficial-sigs.log
1
2
3
sudo systemctl enable clamav-unofficial-sigs.timer
sudo systemctl start clamav-unofficial-sigs.timer
systemctl status clamav-unofficial-sigs.timer

要更改任何默认设置,请参阅并修改/etc/clamav-unofficial-sigs/user.conf

扫描病毒

按需扫描有两种选择:

使用独立扫描器

clamscan 可用于扫描指定文件、家目录或整个系统:

1
2
3
4
$ clamscan myfile
$ clamscan --recursive --infected $HOME
$ sudo clamscan -r -i / -l /var/log/clamscan.log
# clamscan --recursive --infected --exclude-dir='^/sys|^/dev' /

如果想要clamscan删除受感染的文件,请在命令中添加该--remove选项,或者可以使用它--move=/dir来隔离它们。

可能还想要clamscan扫描较大的文件。在这种情况下,将选项--max-filesize=4000M--max-scansize=4000M附加到命令中。’4000M’ 是最大的可能值,可以根据需要降低。

使用该-l /path/to/file选项会将clamscan日志打印到文本文件中,以定位报告的感染情况。

使用守护进程

clamdscan与上述用法类似,但要用到守护程序,守护程序必须运行才能使用该命令。多数选项都会被忽略,因为守护进程读取指定在/etc/clamav/clamd.conf中的设置。

技巧和窍门

多线程运行

使用 clamscan

当从命令行使用clamscan扫描文件或目录时仅会用到单个 CPU 线程。在时间不关键或不希望计算机变得迟钝的情况下,这可能没问题。如果需要快速扫描大文件夹或 USB 驱动器,可能想要使用所有可用的 CPU 来加速该过程。

clamscan被设计为单线程,而xargs可用于并行运行扫描:

1
$ find $HOME -type f -print0 | xargs -0 -P $(nproc) clamscan 

在这个例子中,-P参数 for在与 CPU 一样多的进程中xargs同时运行clamscan(由nproc)报告。--max-lines--max-args选项允许更精细地控制跨线程批量处理工作负载。

使用 clamdscan

如果clamd守护程序正在运行,则可以使用clamdscan来替代 (查阅 Starting the daemon):。

1
$ clamdscan --multiscan --fdpass $HOME

这里的--multiscan参数允许clamd使用可用线程并行扫描目录的内容。当守护进程在clamav用户和组下运行时,--fdpass参数被用来传递文件描述符权限给 clamd

clamdscan可用的线程数在/etc/clamav/clamd.conf clamd.conf(5) 通过MaxThreads参数定义。即使可能会看到MaxThreads指定的数量超过 1(当前默认为 10),但当使用clamdscan命令行启动扫描而不指定--multiscan选项时,只会有一个有效的 CPU 线程用于进行扫描。

参阅

Obsidian_设置_文件与链接

Obsidian 支持双向链接,再配合 Pandoc 导出功能。问题是插入图片路径默认会寻找Vault库的根路径,就会报错找不到插入的图片导致导出失败。
那么需要修改 Obsidian 的配置:
设置 -> 文件与链接:

1
2
3
4
5
6
始终更新内部链接:开启
内部链接类型:插入基于库的绝对路径
使用 Wiki 链接:开启
检测所有类型文件:开启
新附件的默认位置:下方指定的文件夹
子文件夹名称:β-Sources

Obsidian 支持双向链接,Typora 导出功能很强大,在 Obsidian 中粘贴了图片又想要 Typora 能打开,那么需要修改 Obsidian 的配置:
设置 -> 文件与链接:
始终更新内部链接:开启
内部链接类型:插入基于当前笔记的相对路径
使用 Wiki 链接:关闭
检测所有类型文件:开启
新附件的默认位置:当前文件夹下指定的子文件夹中
子文件夹名称:assets
END

KDE-Plasma panel widget config customization

configuration file location

~/.config/plasma-org.kde.plasma.desktop-appletsrc

Panel and widget list

Panel 1:

  • Application Lancher
  • Global Menu

Panel 2:

  • Latte Tasks
  • Analog Clock
  • Digital Colck
  • Weather Report

Panel 3:

  • Minimize all Windows
  • Pager
  • Network Speed
  • Memory Usage
  • System Tray
  • Lock/Logout

Run OP-TEE from scratch

OP-TEE的编译及运行

Reference_&_Useful_URL:
https://www.op-tee.org/
https://github.com/OP-TEE
https://optee.readthedocs.io
https://blog.csdn.net/thanksgining/article/details/108848825
https://blog.csdn.net/zhuyong006/article/details/85282624

宿主环境

  • OS: Ubuntu 20.04 LTS Desktop
  • Disk_Size: 50GB

Get and build the solution

Refer:https://optee.readthedocs.io/en/latest/building/gits/build.html#get-and-build-the-solution

前置条件(Prerequisites)

Refer:https://optee.readthedocs.io/en/latest/building/prerequisites.html#prerequisites

Ubuntu-based distributions

First enable installation of i386 architecture packages and update the package managers database.

1
2
$ sudo dpkg --add-architecture i386
$ sudo apt-get update

Install the following packages regardless of what target you will use in the end.

1
2
3
4
5
6
7
8
$ sudo apt-get install android-tools-adb android-tools-fastboot autoconf \
automake bc bison build-essential ccache cscope curl device-tree-compiler \
expect flex ftp-upload gdisk iasl libattr1-dev libcap-dev \
libfdt-dev libftdi-dev libglib2.0-dev libgmp-dev libhidapi-dev \
libmpc-dev libncurses5-dev libpixman-1-dev libssl-dev libtool make \
mtools netcat ninja-build python-crypto python3-crypto python-pyelftools \
python3-pycryptodome python3-pyelftools python-serial python3-serial \
rsync unzip uuid-dev xdg-utils xterm xz-utils zlib1g-dev

Git 配置

1
2
3
sudo apt install git -y
git config --global user.email "you@example.com"
git config --global user.name "Your Name"

安装repo

Refer:https://mirrors.tuna.tsinghua.edu.cn/help/git-repo/

1
2
3
4
5
6
7
8
9
10
curl https://mirrors.tuna.tsinghua.edu.cn/git/git-repo -o repo
chmod +x repo

sudo mv repo /usr/local/bin/

cat >> ~/.bashrc << "EOF"
export REPO_URL='https://mirrors.tuna.tsinghua.edu.cn/git/git-repo'
EOF

> 并重启终端模拟器。

获取OP-TEE源代码

Refer:https://optee.readthedocs.io/en/latest/building/gits/build.html#get-and-build-the-solution

1
2
3
4
mkdir -p optee-project
cd optee-project
repo init -u git://github.com/OP-TEE/manifest.git -m qemu_v8.xml --repo-url=https://mirrors.tuna.tsinghua.edu.cn/git/git-repo -b 3.8.0
repo sync -j4

由于github仓库网络问题,中间多次重新同步,还辅助以proxychains工具代理外网。
最终,同步了20+GB的数据回来。


获取工具链(toolchain)

1
2
cd optee-project/build
make -j2 toolchains

查看 toolchain.mk 文件可知,执行 make 指令之后,系统会去下载 toolchains 的tar包,包括32位和64位的编译链接工具,下载完成后会进行解压操作。

如果执行 make 指令后,一直卡在“Downloading xxx …”那。

手动到https://developer.arm.com/tools-and-software/open-source-software/developer-tools/gnu-toolchain/gnu-a/downloads下载指定toolchain(toolchain.mk指定了AARCH32_GCC_VERSION和AARCH64_GCC_VERSION)。

这里下载的是gcc-arm-8.3-2019.03-x86_64-arm-linux-gnueabihf.tar.xzgcc-arm-8.3-2019.03-x86_64-aarch64-linux-gnu.tar.xz

将下载的toolchain的tar包放到op-tee源代码的根目录下的toolchains目录,并进行解压:

1
2
tar xf gcc-arm-8.3-2019.03-x86_64-arm-linux-gnueabihf.tar.xz -C aarch32 --strip-components=1
tar xf gcc-arm-8.3-2019.03-x86_64-aarch64-linux-gnu.tar.xz -C aarch64 --strip-components=1

编译(Build the solution)

1
2
3
4
cd optee-project/build
make -j `nproc`
#或者将上述命令写完整些:
make -j `nproc` -f qemu_v8.mk all

编译完成:

如果编译有问题,可以通过管道将日志导入文件,方便排查(查找 ERROR 字符串):

1
make -j `nproc` 2>&1 | tee build.log

注:

  1. 如果 Make 命令运行时没有指定目标,默认会执行 Makefile 文件的第一个目标。
  2. Makefile 文件在 repo 初始化时自动生成,且指向 qemu_v8.mk,因此本例中可只需执行 make 命令:

启动设备

Refer:https://optee.readthedocs.io/en/latest/building/devices/qemu.html#qemu-v8

1
2
cd optee-project/build
make run-only

查看 qemu_v8.mk 文件如下代码块可知,由于运行 make run 会强制执行 make all ,如果没有更新过仓库且只需要单纯启动设备而不需要更新文件系统可以通过执行 make run-only 略过从头再编译一遍的过程。

1
2
3
4
.PHONY: run
# This target enforces updating root fs etc
run: all
$(MAKE) run-only

Terminal: qemu

Terminal: Normal World

Terminal: Secure World

继续运行

在 qemu 的终端 Terminal 里输入 c(小写)然后按 <Enter> 键,让系统继续运行。

Terminal: qemu

Terminal: Normal World

Terminal: Secure World

执行测试(Run xtest)

https://optee.readthedocs.io/en/latest/building/gits/build.html#step-9-run-xtest

1
xtest

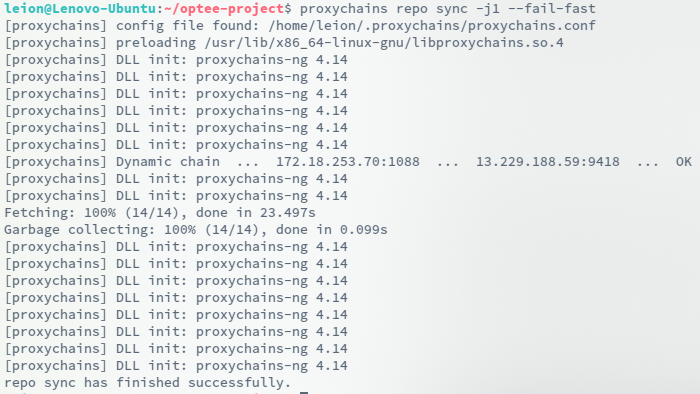
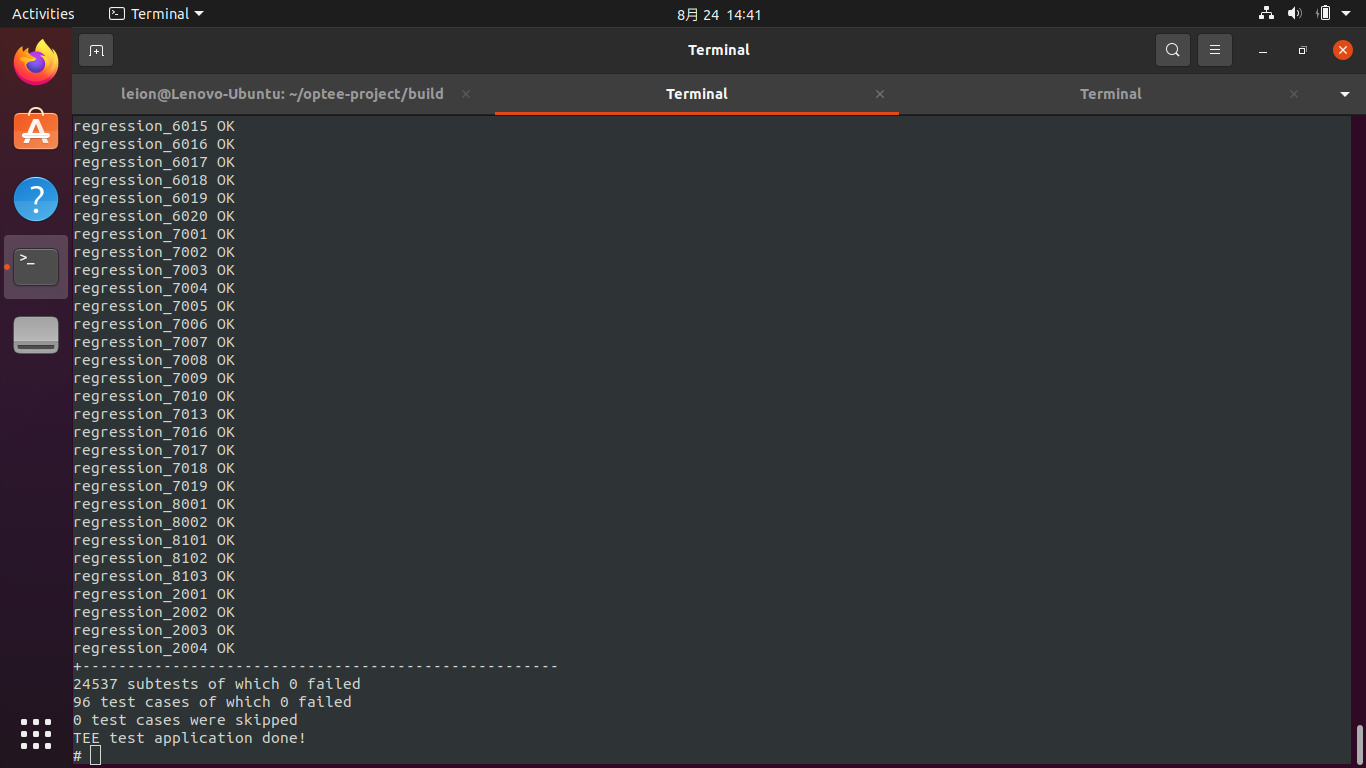
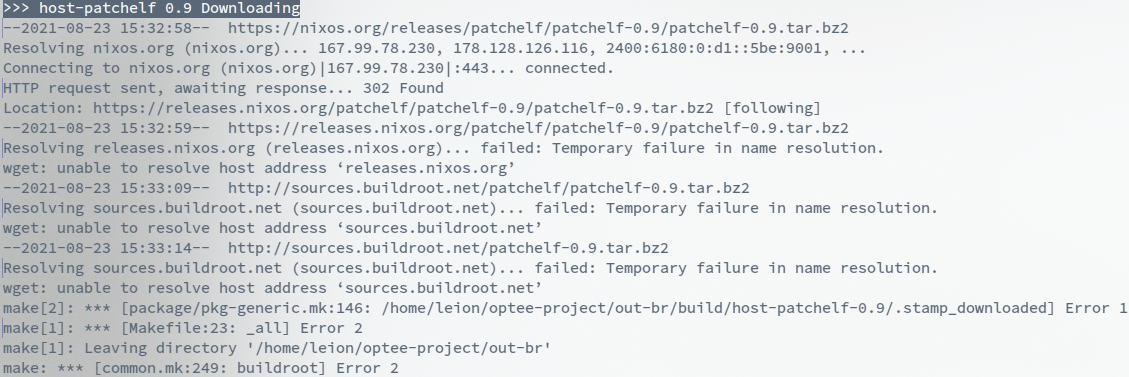
If there are no regressions / issues found, xtest should end with something like this:

1
2
3
4
5
6
...
+-----------------------------------------------------
24537 subtests of which 0 failed
96 test cases of which 0 failed
0 test case was skipped
TEE test application done!

至此,完成。

TODO

Tips and Tricks - Reference existing project to speed up repo sync

https://optee.readthedocs.io/en/latest/building/gits/build.html#reference-existing-project-to-speed-up-repo-sync

Q&A:

repo sync 获取源代码时遇到网络问题

1
2
3
4
5
6
7
8
9
error: Cannot fetch linaro-swg/linux.git from https://github.com/linaro-swg/linux.git  
Fetching:   7% (1/13), done in 4m19.092s
Garbage collecting: 100% (13/13), done in 0.089s
Fetching: 100% (13/13), done in 2h21m29.800s
Garbage collecting: 100% (13/13), done in 0.221s

error: Exited sync due to fetch errors.
Local checkouts *not* updated. Resolve network issues & retry.
`repo sync -l` will update some local checkouts.

解决方法:

make 编译过程的 buildroot 阶段由于网络问题下载 patchelf 失败


在别处下载好后放到 optee-project/buildroot/dl/patchelf 目录下。因为可能遇到多个包下载失败的问题这里可以单独执行 make buildroot 编译此部分以节省时间,等此部分编译通过后再执行一遍 make 命令。
该阶段其他包如果下载失败也可同理解决。

make run 启动两个终端报错,找不到可执行文件 soc_term

报错信息如下:

1
Error: Failed to execute child process “optee-project/build/../soc_term/soc_term” (No such file or directory)

原因是 make all 过程出现问题,没有编译出来 soc_term ,重新执行编译操作:

1
2
cd optee-project/build
make soc-term

或者手动进入soc_term文件夹进行编译:

1
2
cd optee-project/build/soc_term/
make

然而,一般情况下肯定是编译到 soc_term 之前就出错了,所以才没有继续编译 soc_term,此时最好根据终端输出往上查错。

GRUB2引导启动项手动修复实战

Pre

注意如果开机进入的是grub-rescue命令行需要先使用救急控制台修复到 normal 模式,具体修复方式参见https://wiki.archlinux.org/title/GRUB_(简体中文)#使用救急控制台,操作摘录如下:

GRUB 应急控制台里可用的命令有 insmodlsset 和 unset。这个例子里用了 set 和 insmodset 用来修改变量,insmod 用来载入模组以添加功能。

首先,用户必须知道启动分区 (/boot) 所在位置(是一个独立的分区或者是根目录下的子目录),然后设置:

1
grub rescue> set prefix=(hdX,Y)/boot/grub

其中 X 是物理驱动器的编号,而 Y 是分区的编号。
注意: 如果启动分区是个独立的分区,要在路径中省略 /boot(例如键入 set prefix=(hdX,Y)/grub)。

通过加载 linux 模组来扩展命令行的功能:

1
grub rescue> insmod i386-pc/linux.mod

或者直接

1
grub rescue> insmod linux

这个模组会启动对我们熟悉的 linux 和 initrd 命令的支持。


/boot未单独分区,CentOS 7 系统为例:

1. 进入到 GRUB2 命令行,手动引导启动:

1
2
3
4
5
6
7
8
grub > search --file /boot/grub2/grub.cfg
hd0,msdos6
grub > search --file /etc/centos-release
hod0,msdos6
grub > set root=(hd0,6)
grub > linux /boot/vmlinuz-3.10.0-1127.el7.x86_64 root=/dev/sda6 #可用TAB键补全目录和文件名
grub > initrd /boot/initramfs-3.10.0-1127.el7.x86_64.img
grub > boot

可通过ls和cat等grub内置命令帮助辨识OS类型:

ls (hd0,6)/etc/sysconfig/network-scripts/

cat ifcfg-* …


/boot是单独分区,lfs 系统为例:

1. 进入到 GRUB2 命令行,手动引导启动:

1
2
3
4
5
6
7
8
9
10
grub > search --file /grub/grub.cfg
hd0,msdos4
grub > search --file /etc/lfs-release
hd0,msdos8 hd0,msdos7
grub > cat (hd0,7)/etc/lsb-release
DISTRIB_RELEASE=9.0
DISTRIB_DESCRIPTION=Linux From Scratch
grub > set root=(hd0,4)
grub > linux (hd0,4)/vmlinuz-5.2.8-lfs-9.0 root=/dev/sda7 #此处需要单独指明/boot所在分区,而且注意内核文件在该分区的根目录下,因此不能写成`linux (hd0,4)/boot/vmlinuz...`。
grub > boot

2. 进入到 lfs 系统,修正 GRUB2 配置文件:

1
2
3
4
5
vi /boot/grub/grub.cfg
...
set root=(hd0,4)
linux /vmlinuz-5.2.8-lfs-9.0 root=/dev/sda7 ....
...

/boot未单独分区,Ubuntu 18.04 系统为例:

1. 进入到 GRUB2 命令行,手动引导启动:

1
2
3
4
5
6
7
8
9
10
11
12
13
grub > search --file /boot/grub/grub.cfg
hd0,msdos8
grub > search --file /etc/lsb-release
hod0,msdos8 hd0,msdos7
grub > cat (hd0,8)/etc/lsb-release
DISTRIB_ID=Ubuntu
DISTRIB_RELEASE=20.4
DISTRIB_CODENAME=focal
DISTRIB_DESCRIPTION="Ubuntu 20.04.3 LTS"
grub > set root=(hd0,8)
grub > linux /boot/vmlinuz-5.11.0-27-generic root=/dev/sda8 #可用TAB键补全目录和文件名
grub > initrd /boot/initrd.img-5.11.0-27-generic
grub > boot

2. 进入到 CentOS 系统,修正 GRUB2 引导记录和配置文件:

1
2
sudo grub-install /dev/sda
sudo grub-mkconfig -o /boot/grub/grub.cfg

Refer:

Note:

实验环境分区状况:
hd0,msdos6 CentOS
hd0,msdos7 LFS
hd0,msdos8 Ubuntu
hd0,msdos4 LFS-boot

如何正确使用 sudo 调用多重命令

问题现状(Problem)

执行命令 sudo echo xxx > txtPermission denied

1
2
sudo echo 'some_strings' > test.txt
-bash: test.txt: Permission denied

bash 拒绝这么做,说是权限不够.
这是因为重定向符号 > 也是 bash 的命令。sudo 只是让 echo 命令具有了 root 权限,
但是没有让 > 命令也具有 root 权限,所以 bash 会认为这个命令没有写入信息的权限。

解决办法(Solution)

  1. 利用 sh -c 命令,它可以让 bash 将一个字串作为完整的命令来执行,这样就可以将 sudo 的影响范围扩展到整条命令。
    具体用法如下:
1
sudo sh -c "echo 'some_strings' > test.txt"
  1. 利用管道和 tee 命令,该命令可以从标准输入中读取信息并将其同时写入标准输出和文件中,
    具体用法如下:
1
2
echo 'some_strings' | sudo tee test.txt
echo 'some_strings' | sudo tee -a test.txt // -a 是追加的意思,等同于 >>

tee 命令很好用,它从管道接收信息,一边向屏幕输出,一边向文件写入。

  1. 提升 shell 权限。
    sudo -s //提到root 权限。提示符为#
    当你觉得该退回到普通权限时:
    sudo su <username> //退回到 username 权限,提示符为$
    exit 退出当前用户,回到上一层目录.

centos 提升权限: su -
ubuntu 提升权限: sudo -ssudo su

Ubuntu_Desktop实验机初始化配置

1
2
3
4
#安装 sshd 服务
sudo apt install openssh-server -y
sudo sh -c "echo 'PermitRootlogin yes' >> /etc/ssh/sshd_config"
sudo systemctl start opensshd
1
2
#设置默认启动目标
sudo systemctl set-default multi-user.target #默认为 graphical.target
1
2
3
4
5
6
#设置笔记本合上盖子不休眠
sudo sh -c "echo 'HandleLidSwitch=ignore' >> /etc/systemd/logind.conf"
or:
sudo sh -c "sed -i 's/#HandleLidSwitch=.*/HandleLidSwitch=ignore/' /etc/systemd/logind.conf"

sudo systemctl restart systemd-logind

参阅:
[[K.nowledge/Linux_OS/A-lINUX-BOX/SSH~Firewalliptablesufw~SELinux/SSH密钥注入远程主机]]

“SysV 运行级别” 与 “systemd 启动目标” 之间的映射关系

Mapping between runlevels and systemd targets:

1
2
3
4
5
6
7
8
9
10
11
12
13
14
15
16
17
┌──────────────┬───────────────────────────────────────────────────────┬───────────────────────────────────────────────────────────────────────────────────────────────┐
│SysV Runlevel │ systemd Target │ Notes │
├──────────────┼───────────────────────────────────────────────────────┼───────────────────────────────────────────────────────────────────────────────────────────────┤
│0 │ runlevel0.target, poweroff.target │ Halt the system. │
├──────────────┼───────────────────────────────────────────────────────┼───────────────────────────────────────────────────────────────────────────────────────────────┤
│1, s, single │ runlevel1.target, rescue.target │ Single user mode. │
├──────────────┼───────────────────────────────────────────────────────┼───────────────────────────────────────────────────────────────────────────────────────────────┤
│2, 4 │ runlevel2.target, runlevel4.target, multi-user.target │ User-defined/Site-specific runlevels. By default, identical to 3. │
├──────────────┼───────────────────────────────────────────────────────┼───────────────────────────────────────────────────────────────────────────────────────────────┤
│3 │ runlevel3.target, multi-user.target │ Multi-user, non-graphical. Users can usually login via multiple consoles or via the network. │
├──────────────┼───────────────────────────────────────────────────────┼───────────────────────────────────────────────────────────────────────────────────────────────┤
│5 │ runlevel5.target, graphical.target │ Multi-user, graphical. Usually has all the services of runlevel 3 plus a graphical login. │
├──────────────┼───────────────────────────────────────────────────────┼───────────────────────────────────────────────────────────────────────────────────────────────┤
│6 │ runlevel6.target, reboot.target │ Reboot │
├──────────────┼───────────────────────────────────────────────────────┼───────────────────────────────────────────────────────────────────────────────────────────────┤
│emergency │ emergency.target │ Emergency shell │
└──────────────┴───────────────────────────────────────────────────────┴───────────────────────────────────────────────────────────────────────────────────────────────┘

Refer: https://wiki.archlinux.org/title/Systemd#Mapping_between_SysV_runlevels_and_systemd_targets

Hexo Theme Next Configuration

创建主题配置文件

1
2
3
4
# Installed through npm
cp node_modules/hexo-theme-next/_config.yml _config.next.yml
# Installed through Git
cp themes/next/_config.yml _config.next.yml

https://theme-next.js.org/docs/getting-started/configuration.html

修改主题

https://theme-next.js.org/docs/theme-settings/

Use <!-- more --> in your article to break your article manually, which is recommended by Hexo.

修改主题后实时预览

1
hexo clean && hexo g && hexo s

Next主题配置修改:

1
2
3
4
5
6
7
8
9
10
11
12
13
14
15
16
17
18
19
20
21
22
23
24
25
26
27
28
29
30
31
32
33
34
35
36
37
38
39
40
41
42
43
44
45
46
47
48
49
50
51
52
53
54
55
56
57
58
vim _config.next.yml

...
# Schemes
#scheme: Muse
#scheme: Mist
#scheme: Pisces
scheme: Gemini

# Dark Mode
darkmode: false

menu:
#home: / || fa fa-home
#about: /about/ || fa fa-user
#tags: /tags/ || fa fa-tags
#categories: /categories/ || fa fa-th
#archives: /archives/ || fa fa-archive
#schedule: /schedule/ || fa fa-calendar
#sitemap: /sitemap.xml || fa fa-sitemap
#commonweal: /404/ || fa fa-heartbeat

# Sidebar Avatar
avatar:
# Replace the default image and set the url here.
url: avatar.gif #/images/avatar.gif
# If true, the avatar will be displayed in circle.
rounded: true
# If true, the avatar will be rotated with the cursor.
rotated: true

social:
GitHub: https://github.com/leiontong || fab fa-github
E-Mail: mailto:leion.tong@outlook.com || fa fa-envelope

links:
Leion.co: https://www.leion.co

body_scrollbar:
# Place the scrollbar over the content.
overlay: true
# Present the scrollbar even if the content is not overflowing.
stable: false

# `Follow me on GitHub` banner in the top-right corner.
github_banner:
enable: true
permalink: https://github.com/leiontong
title: Follow me on GitHub

# Google Analytics
# See: https://analytics.google.com
google_analytics:
tracking_id: UA-99348322-1
# By default, NexT will load an external gtag.js script on your site.
# If you only need the pageview feature, set the following option to true to get a better performance.
only_pageview: false